

Just in time for Easter, the Australian brand Ulta3 has released a new limited edition speckled-pastel collection that is so incredibly adorable and boasts some of the cutest themed names you could ever dream to come up with! This collection includes six shades that apply as creme and contain two different sized black glitters – plentiful fine glitter and sparser hexes.

Excuse me while I tell you in delight, my love for the names of these polishes. From L-R: Hop Pink, Bunny Bloom, Hot Cross Fun, Egg-cellent, Blue Bunny and Hippidy Hop.

Ulta3 ‘Hop Pink’ – Medium pink with black fine and hex glitters.
This is most definitely my pick for the whole collection. I absolutely love the medium pink colour and how much the whole look screams ‘watermelon’! I find that this polish has the best formula and applies like a dream. There is also great glitter payoff without having to dig for it. Note: my camera didn’t capture the colour of this exactly, it actually has stronger pink tones.

Ulta3 ‘Bunny Bloom’ – Baby pink with black fine and hex glitters.
This is a pale, baby pink polish that screams pastel and springtime. The colour is what I would define as being ‘cute and delicate’. The glitter payoff is decent for this polish but the base colour itself is a little opaque for my liking.

Ulta3 ’Hot Cross Fun’ – Pale yellow with black fine and hex glitters.
This would probably be a close second for my favourites from this collection. The amount of glitter, colour and application are all very good. I was happy with the opacity and consistency of the polish! The overall look is very poppy seed cake-esque. Yum!

Ulta3 ‘Egg-cellent’ – Dusty green with black fine and hex glitters.
On first glance, I thought I wouldn’t like this colour at all, but it turned out to be very nice. It borders on being a dull pastel green with undertones of grey. The polish is thin and not fully opaque, which works well with layering the glitter. The glitter payoff for this polish is very good.

Ulta3 ‘Blue Bunny’ – Bright baby blue with black fine and hex glitters.
This was probably my least favourite polish from the collection. As you can probably see, the formula on this is the most opaque and the glitter is very sparse. It is a pretty colour, very pigmented and a shade darker than one of my favourites Ulta3 ‘Soft Hydrangea’, but I wish it was a little more transparent for this look.
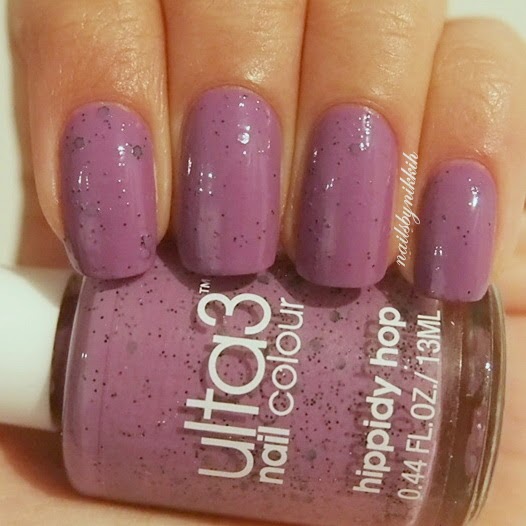
Ulta3 ‘Hippidy Hop’ – Medium purple with black fine and hex glitters.
The colour on this polish is not as pastely as the others. It is quite dark and a little dull, but still pretty. The formula is thin and the polish goes on quite opaque. The glitter is also quite sparse compared to some of the other polishes.

All these swatches are 2 decent coats of polish. If I had to rank the polishes from my favourite to least favourite, it would be, ‘Hop Pink’, ‘Hot Cross Fun’, ‘Egg-cellent’, ‘Hippidy Hop’ and then ‘Bunny Bloom’. This is definitely a collection worth getting if you love pastels, want Easter themed nails or want something a little different in your collection!
These polishes are $3 each and are in stores in April. It's also limited edition so get in quick!
*The products were sent to me in a press release, but I maintain that the views in this post are my most honest opinions.*


