Friday, 21 November 2014

[Tutorial] Watercolour nails w/ ulta3


How Spring/Summer appropriate are these nails?! After receiving a nail polish package from Ulta3, my new current nail art addiction is playing around with 'watercolour' polishes. These are special polishes that apply transparently and can be built up to intensify the colours. The base of this design is lovely in itself but I added some polka dots to give it a cuter effect.


This nail polish set from Ulta3 comes with 5 colours (1 white & 4 watercolours) for just $10! You can also buy them separately for $2. I was always keen to try out the OPI watercolour polishes but was put off by the hefty price. These Ulta3 polishes work in the same manner and I have read multiple comparative reviews that have suggested that they are even better than the OPI ones! 

Even without comparison, to me the formula for these are close to perfect. Although the white polish is quite standard, taking 2-3 coats to be opaque, it still does its job as a base colour. The watercolour polishes work well with a single coat and do not take long to dry. 

A thing to note about these polishes is that you can achieve a lighter, more pastel shade by removing most of the polish from the brush before applying, or alternately, layer/apply thicker coats to achieve a darker shade. To obtain the cohesive watercolour splatter effect for this tutorial design however, I opted for the first option.

  1. Apply white polish until opaque.
  2. Before applying the first watercolour, wipe off most of the polish from the brush onto the edge of the bottle. Lightly dab the colour in randomised positions on the nail. Irregularity and inconsistency is the key here. Don't try too hard to make it look perfect because the randomness is what gives a nice effect. 
  3. Choose a second colour and apply it in the same way as step 2. You may choose to overlap the first colour in some areas to allow for smooth transitions between the two colours.
  4. Choose a third colour and apply in the remaining spaces.
  5. Add in some polka dots using a dotting tool.


If you don't like the polka dot look, this is what the watercolour base looks like by itself. It is still pretty and definitely Spring/Summer appropriate! A big tip that I suggest for this design is applying the colours from least to most transparent. What I mean by this is that some of the colours in the pack are more transparent than others; applying the most transparent last means that you can overlap the colours more seamlessly when filling in the remaining white spaces at the very end.


Hope you enjoyed this tutorial. I'd love to see your recreations on Instagram! (tag me @nailsbynikkih)


*This product was sent to me for review. I maintain that the views in this post are my most honest opinions.*

Saturday, 13 September 2014

Bright Accent Nail w/ BPS Tip Guides


The sunny weather has finally come around in Perth and I thought I'd reflect this by wearing some uber bright and fun nails. For this look I used the orange-yellow-pink combo and paired this with an accent and gradient. The accent nail was achieved using a pre-cut sticker guide from Born Pretty Store as you will see in the tutorial below.


These tip guides are so handy and are excellent for achieving a quick design without much prep! They work like any other form of tape design - just stick over a base colour, paint on another colour and peel off the sticker! I found that these stickers stuck on very well, however I do wish they were made a little thinner, as thicker stickers can sometimes mess up the design when you go and peel them off. Aside from that, I peeled cautiously and it all worked out well! If you are interested in these stickers, you can purchase them here. You can also get 10% off at checkout and free shipping with the code HOWG10.


Next onto the polishes! From left to right, OPI 'Alpine Snow', ulta3 'Tangerine Tango', ulta3 'Honolulu' and ulta3 'Pink Hibiscus'.


  1. Paint a thin coat of white polish as a base to make your bright colours pop more.
  2. Follow up with one coat of yellow polish. Allow this to dry completely before going on to the next step. You may wait it out or add a coat of fast drying top coat to speed up the process.
  3. Grab a tip guide sticker and place it in the desired position on the nail. Press down firmly so there are no loose edges.
  4. Paint over the sticker with your desired colours. I used orange on the top half of my nail and pink on the bottom.
  5. Peel off the sticker immediately while the polish from step 4 is still wet.


You may choose to do this on all your nails or alternatively, use it as an accent. On my other nails I did a gradient with the same colours. Simply paint the colours onto a makeup sponge (as seen below) and dab onto a white base. Top the gradient off with a top coat to blend all the colours together.


And that is all you need to know to achieve this design! Please share your recreations with me on Instagram by tagging me @nailsbynikkih!


*This product was sent to me for review. I maintain that the views in this post are my most honest opinions.*

Saturday, 23 August 2014

[Tutorial] Black and White Florals w/ BPS studs


As you can probably tell I've been having a bit of a floral obsession lately! Similarly, I've been loving my black and whites, so this design was inevitable! I decided to pair this with silver to utilise these AMAZING holographic silver studs I received from Born Pretty Store. For anyone interested in buying these for themselves or other nail art products, I have a code for 10% off all items + free worldwide shipping (HOWG10).


For this look you will need black, white and silver nail polish. From left to right I used OPI 'Black Onyx', OPI 'Alpine Snow' and OPI 'DS Radiance'.


You will also need some silver studs. As you can see, they have a beautiful holographic effect that allows them to sparkle in the light. This particular pack comes with 300 studs for USD$4.20. In general, studs are quite versatile decorations, so for my design I chose to use them in the center of my flowers.


Finally, you will need a dotting tool and a fine paint brush for detailing! Alternately, you can use a toothpick to achieve the same effect!


  1. Apply a black polish to your nail. I used 1 coat.
  2. Dip a dotting tool into white polish and proceed to dot on flower shapes, leaving some space around each flower for step 3.
  3. Use a fine paint brush dipped in white polish to draw a few leaves coming out of each flower. Fill in any gaps with small dots.
  4. Use a toothpick dipped in water or tweezers to pick up the studs and place them carefully in the centre of each flower.

Amazingly, that's all that's required for this design! It can easily be incorporated as a sophisticated accent nail or as a full manicure if you have the patience! Please share your recreations with me on Instagram by tagging me @nailsbynikkih


*This product was sent to me for review. I maintain that the views in this post are my most honest opinions.*

Saturday, 26 July 2014

[Tutorial] Tropical Floral Nails


The weather here in Perth has been rather gloomy recently, so I thought I'd liven up my life a little with some tropical floral nails. I absolutely love this design! I was inspired by @polishpeach on Instagram when I saw her lovely nail art that you can see here. Her choice of a pastel yellow and lighter pink have such a pretty effect, though I personally chose to go a little more tropical with a bright yellow and red.


For this design you will need various colours, a thin paint brush and also a dotting tool (you can also use a toothpick). From left to right the colours I used were OPI 'Big Apple Red', OPI 'Pink Friday', Ulta3 'Honolulu', The Face Shop 'GR502', Sally Hansen 'Mint Sorbet' and Sally Hansen 'Black Out'.


  1. Apply a yellow polish onto your nail until opaque (I used 3 coats).
  2. Use a dotting tool and a stippling effect to draw red flowers onto the yellow polish. Dot red nail polish onto a piece of paper, dip the dotting tool and start by giving the flower 5 petals. From there, shape the flowers until the desired look is achieved.
  3. Use a thin paint brush dipped in pale pink polish to draw V shapes on each petal.
  4. Use a dotting tool dipped in black polish to form a black dot onto the centre of the flower.
  5. Use a dotting tool dipped in yellow polish to form dots at the base of each petal, near the black dot. (This step is optional, depending on if you prefer the look of the flower in step 4 or 5, though I personally feel that the yellow makes the flower much more blended in with the background.)
  6. With the thin paint brush dipped in green polish, draw leaves coming out from the flowers.
  7. Use the paint brush to add detail to the leaves by using a mint green polish.


And this is the finished result! The design can easily be used as an accent nail or if you have enough time and patience, done as a full manicure as below.


The steps to this design may seem quite complex, but I can assure you that it is not too hard to achieve! I'd love to see any recreations of this design by tagging me @nailsbynikkih on Instagram!

Saturday, 28 June 2014

[Tutorial] Floral Chevron Nails


As you are probably aware, I have been inactive on both my blog and Instagram for quite awhile now. Over the past months I have had to deal with a couple of issues and decided to take a break from doing nail art designs. I am now ready to get back into it all with new tutorials and designs to come! 


Floral nails seem to always be my fall-back design as I feel they never fail to make your nails look highly sophisticated and impressive. I felt a bit adventurous and attempted to incorporate the floral look into a chevron design.


For this design you will need a white polish, a green polish and three shades of pink. From left to right, I used the colours OPI 'Alpine Snow', Ulta3 'Pale Dahlia', OPI 'Pink Friday', Sally Hansen 'Bubblegum Pink' and Sally Hansen 'Mint Sorbet'.


You will also need a couple of other nail art items. I used a dotting tool and thin paint brush to assist me with the flowers, however using a toothpick will also allow you to achieve the same effect. I also used striping tape, and two different sized pink gems (optional).


  1. Apply a white polish onto your nail until opaque. I used 2 coats. Let this dry completely or apply a layer of fast drying top coat.
  2. Cut two pieces of striping tape and place on the nail in a V shape.
  3. Paint the lightest pink shade onto the tip of the nail, making sure you are careful not to go over the striping tape.
  4. While the polish is still wet, peel off the striping tape.
  5. Use a dotting tool or toothpick to dab on a few pink blobs. Use the medium pink.
  6. Use a thin paint brush or toothpick to draw on small curved lines. Use the darkest pink.
  7. Use a thin paint brush or toothpick to draw small green petals next to the flowers.
  8. Finish off the design with a layer of top coat and place some pink gems along the V line created earlier.

This is such a simple design to achieve, yet it has the effect of making your nails look very sophisticated and pretty. I'd love to see any recreations of this design by tagging me @nailsbynikkih on Instagram!


Sunday, 30 March 2014

[Review] Ulta3 Speckled Egg collection


Just in time for Easter, the Australian brand Ulta3 has released a new limited edition speckled-pastel collection that is so incredibly adorable and boasts some of the cutest themed names you could ever dream to come up with! This collection includes six shades that apply as creme and contain two different sized black glitters – plentiful fine glitter and sparser hexes.


Excuse me while I tell you in delight, my love for the names of these polishes. From L-R: Hop Pink, Bunny Bloom, Hot Cross Fun, Egg-cellent, Blue Bunny and Hippidy Hop. 


Ulta3 ‘Hop Pink’ – Medium pink with black fine and hex glitters.
This is most definitely my pick for the whole collection. I absolutely love the medium pink colour and how much the whole look screams ‘watermelon’! I find that this polish has the best formula and applies like a dream. There is also great glitter payoff without having to dig for it. Note: my camera didn’t capture the colour of this exactly, it actually has stronger pink tones.


Ulta3 ‘Bunny Bloom’ – Baby pink with black fine and hex glitters.
This is a pale, baby pink polish that screams pastel and springtime. The colour is what I would define as being ‘cute and delicate’. The glitter payoff is decent for this polish but the base colour itself is a little opaque for my liking.


Ulta3 ’Hot Cross Fun’ – Pale yellow with black fine and hex glitters.
This would probably be a close second for my favourites from this collection. The amount of glitter, colour and application are all very good. I was happy with the opacity and consistency of the polish! The overall look is very poppy seed cake-esque. Yum!


Ulta3 ‘Egg-cellent’ – Dusty green with black fine and hex glitters.
On first glance, I thought I wouldn’t like this colour at all, but it turned out to be very nice. It borders on being a dull pastel green with undertones of grey. The polish is thin and not fully opaque, which works well with layering the glitter. The glitter payoff for this polish is very good. 


Ulta3 ‘Blue Bunny’ – Bright baby blue with black fine and hex glitters.
This was probably my least favourite polish from the collection. As you can probably see, the formula on this is the most opaque and the glitter is very sparse. It is a pretty colour, very pigmented and a shade darker than one of my favourites Ulta3 ‘Soft Hydrangea’, but I wish it was a little more transparent for this look.


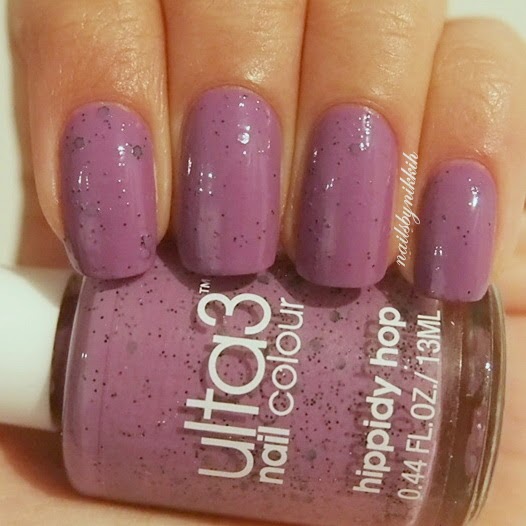
Ulta3 ‘Hippidy Hop’ – Medium purple with black fine and hex glitters.
The colour on this polish is not as pastely as the others. It is quite dark and a little dull, but still pretty. The formula is thin and the polish goes on quite opaque. The glitter is also quite sparse compared to some of the other polishes.


All these swatches are 2 decent coats of polish. If I had to rank the polishes from my favourite to least favourite, it would be, ‘Hop Pink’, ‘Hot Cross Fun’, ‘Egg-cellent’, ‘Hippidy Hop’ and then ‘Bunny Bloom’. This is definitely a collection worth getting if you love pastels, want Easter themed nails or want something a little different in your collection! 

These polishes are $3 each and are in stores in April. It's also limited edition so get in quick!


*The products were sent to me in a press release, but I maintain that the views in this post are my most honest opinions.*

Thursday, 30 January 2014

[Tutorial] Brocade Nails - Maybelline NY Australia x nailsbynikkih collaboration


A couple of weeks ago I was thrilled to have been asked to do a collaboration with Maybelline New York Australia! I gratefully accepted and they sent me the new Maybelline Color Show Brocades collection (along with some other goodies) to play with! The limited edition collection boasts 5 beautiful metallic-esque, glitter shades that certainly reflect the 'brocade' look. They are available for $5.95 at Priceline and Target until March!


I was asked to do a video tutorial for a design using the new collection and in the end, this is what I came up with! The design requires a couple of different tools and polishes but it is easily achievable and very versatile!

To learn how to achieve this look, watch my video below! I'd especially like to thank Victor Zhang, who helped me shoot and edit the video, and James Jung for assisting. Enjoy!