Saturday, 26 July 2014

[Tutorial] Tropical Floral Nails


The weather here in Perth has been rather gloomy recently, so I thought I'd liven up my life a little with some tropical floral nails. I absolutely love this design! I was inspired by @polishpeach on Instagram when I saw her lovely nail art that you can see here. Her choice of a pastel yellow and lighter pink have such a pretty effect, though I personally chose to go a little more tropical with a bright yellow and red.


For this design you will need various colours, a thin paint brush and also a dotting tool (you can also use a toothpick). From left to right the colours I used were OPI 'Big Apple Red', OPI 'Pink Friday', Ulta3 'Honolulu', The Face Shop 'GR502', Sally Hansen 'Mint Sorbet' and Sally Hansen 'Black Out'.


  1. Apply a yellow polish onto your nail until opaque (I used 3 coats).
  2. Use a dotting tool and a stippling effect to draw red flowers onto the yellow polish. Dot red nail polish onto a piece of paper, dip the dotting tool and start by giving the flower 5 petals. From there, shape the flowers until the desired look is achieved.
  3. Use a thin paint brush dipped in pale pink polish to draw V shapes on each petal.
  4. Use a dotting tool dipped in black polish to form a black dot onto the centre of the flower.
  5. Use a dotting tool dipped in yellow polish to form dots at the base of each petal, near the black dot. (This step is optional, depending on if you prefer the look of the flower in step 4 or 5, though I personally feel that the yellow makes the flower much more blended in with the background.)
  6. With the thin paint brush dipped in green polish, draw leaves coming out from the flowers.
  7. Use the paint brush to add detail to the leaves by using a mint green polish.


And this is the finished result! The design can easily be used as an accent nail or if you have enough time and patience, done as a full manicure as below.


The steps to this design may seem quite complex, but I can assure you that it is not too hard to achieve! I'd love to see any recreations of this design by tagging me @nailsbynikkih on Instagram!

Saturday, 28 June 2014

[Tutorial] Floral Chevron Nails


As you are probably aware, I have been inactive on both my blog and Instagram for quite awhile now. Over the past months I have had to deal with a couple of issues and decided to take a break from doing nail art designs. I am now ready to get back into it all with new tutorials and designs to come! 


Floral nails seem to always be my fall-back design as I feel they never fail to make your nails look highly sophisticated and impressive. I felt a bit adventurous and attempted to incorporate the floral look into a chevron design.


For this design you will need a white polish, a green polish and three shades of pink. From left to right, I used the colours OPI 'Alpine Snow', Ulta3 'Pale Dahlia', OPI 'Pink Friday', Sally Hansen 'Bubblegum Pink' and Sally Hansen 'Mint Sorbet'.


You will also need a couple of other nail art items. I used a dotting tool and thin paint brush to assist me with the flowers, however using a toothpick will also allow you to achieve the same effect. I also used striping tape, and two different sized pink gems (optional).


  1. Apply a white polish onto your nail until opaque. I used 2 coats. Let this dry completely or apply a layer of fast drying top coat.
  2. Cut two pieces of striping tape and place on the nail in a V shape.
  3. Paint the lightest pink shade onto the tip of the nail, making sure you are careful not to go over the striping tape.
  4. While the polish is still wet, peel off the striping tape.
  5. Use a dotting tool or toothpick to dab on a few pink blobs. Use the medium pink.
  6. Use a thin paint brush or toothpick to draw on small curved lines. Use the darkest pink.
  7. Use a thin paint brush or toothpick to draw small green petals next to the flowers.
  8. Finish off the design with a layer of top coat and place some pink gems along the V line created earlier.

This is such a simple design to achieve, yet it has the effect of making your nails look very sophisticated and pretty. I'd love to see any recreations of this design by tagging me @nailsbynikkih on Instagram!


Sunday, 30 March 2014

[Review] Ulta3 Speckled Egg collection


Just in time for Easter, the Australian brand Ulta3 has released a new limited edition speckled-pastel collection that is so incredibly adorable and boasts some of the cutest themed names you could ever dream to come up with! This collection includes six shades that apply as creme and contain two different sized black glitters – plentiful fine glitter and sparser hexes.


Excuse me while I tell you in delight, my love for the names of these polishes. From L-R: Hop Pink, Bunny Bloom, Hot Cross Fun, Egg-cellent, Blue Bunny and Hippidy Hop. 


Ulta3 ‘Hop Pink’ – Medium pink with black fine and hex glitters.
This is most definitely my pick for the whole collection. I absolutely love the medium pink colour and how much the whole look screams ‘watermelon’! I find that this polish has the best formula and applies like a dream. There is also great glitter payoff without having to dig for it. Note: my camera didn’t capture the colour of this exactly, it actually has stronger pink tones.


Ulta3 ‘Bunny Bloom’ – Baby pink with black fine and hex glitters.
This is a pale, baby pink polish that screams pastel and springtime. The colour is what I would define as being ‘cute and delicate’. The glitter payoff is decent for this polish but the base colour itself is a little opaque for my liking.


Ulta3 ’Hot Cross Fun’ – Pale yellow with black fine and hex glitters.
This would probably be a close second for my favourites from this collection. The amount of glitter, colour and application are all very good. I was happy with the opacity and consistency of the polish! The overall look is very poppy seed cake-esque. Yum!


Ulta3 ‘Egg-cellent’ – Dusty green with black fine and hex glitters.
On first glance, I thought I wouldn’t like this colour at all, but it turned out to be very nice. It borders on being a dull pastel green with undertones of grey. The polish is thin and not fully opaque, which works well with layering the glitter. The glitter payoff for this polish is very good. 


Ulta3 ‘Blue Bunny’ – Bright baby blue with black fine and hex glitters.
This was probably my least favourite polish from the collection. As you can probably see, the formula on this is the most opaque and the glitter is very sparse. It is a pretty colour, very pigmented and a shade darker than one of my favourites Ulta3 ‘Soft Hydrangea’, but I wish it was a little more transparent for this look.


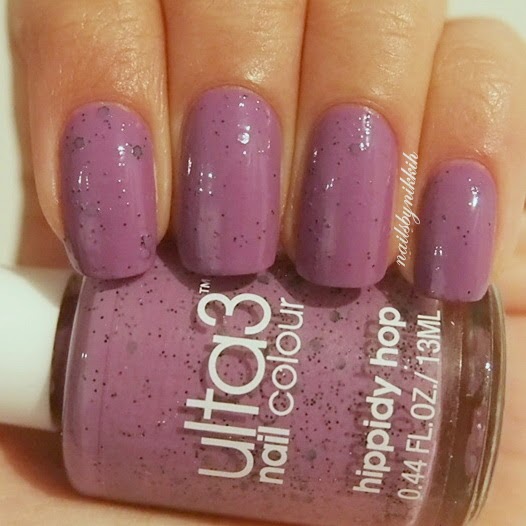
Ulta3 ‘Hippidy Hop’ – Medium purple with black fine and hex glitters.
The colour on this polish is not as pastely as the others. It is quite dark and a little dull, but still pretty. The formula is thin and the polish goes on quite opaque. The glitter is also quite sparse compared to some of the other polishes.


All these swatches are 2 decent coats of polish. If I had to rank the polishes from my favourite to least favourite, it would be, ‘Hop Pink’, ‘Hot Cross Fun’, ‘Egg-cellent’, ‘Hippidy Hop’ and then ‘Bunny Bloom’. This is definitely a collection worth getting if you love pastels, want Easter themed nails or want something a little different in your collection! 

These polishes are $3 each and are in stores in April. It's also limited edition so get in quick!


*The products were sent to me in a press release, but I maintain that the views in this post are my most honest opinions.*

Thursday, 30 January 2014

[Tutorial] Brocade Nails - Maybelline NY Australia x nailsbynikkih collaboration


A couple of weeks ago I was thrilled to have been asked to do a collaboration with Maybelline New York Australia! I gratefully accepted and they sent me the new Maybelline Color Show Brocades collection (along with some other goodies) to play with! The limited edition collection boasts 5 beautiful metallic-esque, glitter shades that certainly reflect the 'brocade' look. They are available for $5.95 at Priceline and Target until March!


I was asked to do a video tutorial for a design using the new collection and in the end, this is what I came up with! The design requires a couple of different tools and polishes but it is easily achievable and very versatile!

To learn how to achieve this look, watch my video below! I'd especially like to thank Victor Zhang, who helped me shoot and edit the video, and James Jung for assisting. Enjoy!


Thursday, 12 December 2013

[Tutorial] The Trend: Gradient Nails


The Trend

Gradients have become one of the most popular techniques for nail artists, whether they stand on their own or are incorporated as a base for a design. What makes gradient nails so great is that they are so customisable and can easily be achieved by anyone with the right tools. This look uses a sponge to dab on various polishes and has the effect of creating well-blended colours.

The Look


This is the look that can be achieved with the tutorial below. There are many gradient tutorials on the web, some using other techniques, but this is the way that I personally do it. I chose to do a gradient with different colours and I have just realised I unintentionally made the gradient the same as my blog background!

The Technique


The polishes I have used for this manicure from L to R are: OPI 'Alpine Snow', OPI 'Mod About You', Revlon 'Charming', Ulta3 'Soft Hydrangea', OPI 'Gargantuan Green Grape', Seche Vite fast drying top coat and China Glaze 'Fairy Dust (optional). This may seem like a lot of different polishes but the look is customisable to whatever colours you have and wish to use, whether it be 2 or 3 or more.


You will also need a makeup sponge of some sort. These may come in various shapes and sizes.

  1. Apply a white polish onto your nail until opaque. I used 2 coats. Let dry.
  2. Paint the colours you wish to have in your gradient straight onto the makeup sponge (see below). Dab the sponge 1 or 2 times onto a piece of paper and then sponge onto your nail. Let dry.
  3. Repeat step 2 again and again until the gradient is at the intensity that you would like it. Make sure you wait for the previous layer to dry before dabbing on the next layer. If the layer below is still wet, the sponge may pick up previous layers and it may ruin the gradient.
  4. Apply a fast drying top coat onto the gradient. This should smoothen out the gradient and make it look well-blended.
  5. Clean up the edges of your nail with acetone. I used a cotton tip to do this.
  6. (Optional) Add a glitter of your choice onto the gradient. 

This is what my sponge looked like in step 2 above. I painted the lines so they would match the length of my nails and I used this small part of the sponge for the whole manicure.

The possibilities for this look are endless. I chose to create a gradient with different colours but you may choose to use monochromatic colours or as little or as many colours that you wish. For other gradients that I have done previously you can look here and here. You may also wish to incorporate this look into a design as I have done here, or as a background for other art.


Sunday, 17 November 2013

[Tutorial and Review] The Trend: Jelly Sandwich (Essence 'Ticket to Paradise')


The Trend

To the nail art newbie, the jelly sandwich may just be a yummy type of food, but to the nail art connoisseur, the jelly sandwich is a fun nail art look that is easily achievable with the right products. You may have heard of the term ‘jelly’ thrown about by nail art fanatics and wondered what they were talking about… well we will demystify it in this post. This trend has been around for awhile now and has grown in popularity recently with a major increase in the jelly sandwich polishes available from indie brands.


What is a Jelly?

In all its simplicity, a ‘jelly polish’ is any polish that has a semi-transparent look to it, as opposed to a ‘cream polish’ that applies fully opaque. 


In the comparison above, on the left is one coat of an orange jelly and on the right is one coat of an orange cream. You can see that the nail line is visible with the jelly polish and that it has a semi-transparent finish.


The Look


This is a typical ‘jelly sandwich’ that can be easily re-created with a good plain jelly polish and some loose glitter.


This polish is Essence ‘Sun Said Red’. It is the jelly polish I have used for this look and comes from the new Essence ‘Ticket to Paradise’ collection. It is described as having a ‘semi-transparent gel-like texture’ and is available in a range of 4 colours. The whole collection that includes a shimmer powder, eyeshadows, lip glosses, hair mascara and lip liners are exclusive to Priceline stores and will be available in December.


This is one coat of the jelly polish.


This is two coats of the jelly polish. You can see that it is such a beautiful polish with two applications. The finish on this polish was very glossy and the drying time was not too bad at all. The formula was excellent and the colour pay off is well worth the $2.95 price tag. I wish I had a bigger bottle! Highly recommended!


The Jelly Sandwich

Now to the fun part…with such a transparent application, jelly polishes can be used to make the humble jelly sandwich. It involves an assortment of glitter sandwiched between layers of the polish!


1)      Paint one coat of a jelly finish polish.
2)      While the polish is still wet, add any combination of loose glitter on top. I used pink, dark blue and silver hex glitters.
3)      Apply another coat of the jelly finish polish on top.
4)      Add more glitter.
5)      Apply another coat of the jelly polish.

The possibilities for this look are endless! The trick is to apply multiple sandwiched layers to get the effect that the glitter is actually embedded into the polish. With the finished nail there should be some depth to the look, with some glitter looking deeper than others.


*The products were sent to me in a press release, but I maintain that the views in this post are my most honest opinions.*

Saturday, 16 November 2013

[Tutorial] The Trend: The Floral French


The Trend

Floral tips per se have not yet become a nail art trend, but I thought I’d do a tutorial and make it one! Its two components, the floral design and the ‘french manicure look’, are trends in themselves and work nicely together to make a simple yet elegant design. 

The Look


This is the design that can be achieved in this tutorial. I’d like to call it the 'Floral French'! The flowers were completed using a dotting tool and a thin paint brush.

The Technique


The colours I have used are from L-R: OPI ‘Alpine Snow’, Essence ‘Ben & Cherries’, OPI ‘Elephantastic Pink’, Ulta3 ‘Soft Hydrangea’, Sally Hansen ‘Blue Me Away’ and The Face Shop ‘GR502’.


I also used a large dotting tool and a very thin paint brush, but you can also use a bobby pin and a tooth pick.


1)      Paint your nail a base colour. A white base will make the flowers pop out more.
2)      Using a large dotting tool, paint some light pink blotches.
3)      Repeat this with a light blue.
4)      Blob a bit of dark pink nail polish onto a scrap piece of paper, dip in a thin paint brush and carefully paint thin ‘C shaped’ lines onto the light pink base.
5)      Repeat this step with a darker blue onto the light blue blotches.
6)      Finally, add some green leaves with the paint brush.

With those simple steps you can achieve some pretty floral French nails. Try this with any combination of colours and tag @nailsbynikkih on Instagram to show me!

-------------------------------------------------------------------------------------------------

Inspiration and Suggestions


This design was inspired by @liana_riches on Instagram. She did half florals and paired them with some simple stripes. You can find her here (she does a killer one-stroke floral)!